Monday, March 14, 2011

Easter Treats

Good morning everyone.  I hope you're enjoying the long weekend.  My poor husband is full of a head cold (the flu according to him) so we'll be staying around the house today - which suits me because I've got a few card ideas in my head which I'd like to make.  

At my last Stamp A Stack class the girls made these gorgeous little Easter Treats.  

This little Sunnyboy container has little Easter Eggs in it - it would probably hold around 10 mini eggs and is a great gift idea.  The container is made from a piece of 15cm x 15cm designer series paper.   

The stamp set is Stampin' Up!'s A Good Egg from the current Idea Book and Catalogue.  I just love this stamp set and pull it out each Easter.  In the past I've also used the little circles stamp as bubbles on children's cards.  The little chick is also cute on new baby cards - see, quite a versatile stamp set.
You can't see it from the photo's, but I've added Dazzling Diamonds glitter to the egg shell and it's been stuck on with a dimensional.  The chick has been stamped onto watercolour paper and coloured using ink and blender pens.

This is a great gift idea for neighbours, teachers, children, EVERYONE.

Sunday, March 6, 2011

Extreme Surfboard

I currently have 5 (yes, 5) birthday party invitations stuck to my fridge for Bailey to attend.  I made up a stack of these cards yesterday using the Extreme Surfboard stamp set.

This is a great stamp for boys of all ages - big and small.   The image is stamped with Basic Black ink and I added a bit of faux stitching, tore the Basic Black card stock and distressed the Not Quite Navy card stock.  I also spritzed Basic Black marker ink over the entire card when it was finished.

I'm sure the boys will never know that they've all received the same card from Bailey.....

Saturday, March 5, 2011

Aviary Cute Stamp Set

It took me a little while to purchase this stamp set, but boy I'm glad I did.  How coot are those little birds?  I have a feeling I'll be whipping up quite a few cards with this set.  This is a quick card I made for one of my  hostesses.

The ribbon was a little tricky - you have to find a single thread at the end of your ribbon and pull it to give you the ruffled effect - and then stick it in place.  I notice that my ribbon was a little crooked - darn it!

Friday, March 4, 2011

40th Birthday Cards

A friend recently asked me to make a 40th birthday card for a close friend of hers.  The only request was that the card have the number 40 on it - the rest was up to me.  Now, I love having creative licence like everyone else, but I always worry that my taste might not necessarily be my customers' taste.

I decided to make two cards and let her choose from them. This was the first card I made:

And then I came up with this one: 

Which card do you think my friend chose?  The blue and green one - phew, lucky I decided to make two cards.

Monday, February 28, 2011

Belated Valentine

These are a couple of the cards that we made at my last Stamp A Stack.  I really love the owl two step punch.  This was the card we all made for Valentine's Day:

And then we made a couple of little gift cards.  It was great so see all the different coloured owls that the girls made.

Tuesday, February 22, 2011

Simple Birthday Thanks

Last year all three of my children had birthday parties (I know, what were we thinking??).  With parties come gifts so I purchased the Simple Birthday Thanks stamp to make thank you cards for all the guests that attended each of the birthday parties - did I finish the cards - no - but that's another story....

Anyway, I was looking at the stamp the other day thinking it was a shame that I hadn't used it for it's intended purpose, and that I probably wouldn't use it again until we celebrated another birthday.

All of a sudden I realised that it didn't have to only be used as a thank you stamp.

Using a black marker I coloured all the lines of the cupcake that I wanted to stamp.  I stamped the image onto pretty in pink and whisper white card stock, and bashful blue and whisper white card stock.

How cute are these cards??   I've now got a selection of cards on hand for the birthday parties my kids get invited to AND I'm using a stamp that I originally only thought could be used as a thank you stamp.

I've used the square lattice embossing folder (from the Summer Mini Catalogue) on so saffron card stock behind the cupcake.  I love this embossing folder!!  The numbers were created from the Timeless Type Junior Alphabet dies.  I used red fine galaxy glitter as the sprinkles and the number and cherry were created with real red card stock.
Don't forget that Sale-A-Bration and the Summer Mini Catalogue end on the 31st of March.


Sunday, February 6, 2011

sale-a-bration time


This is a fantastic time of the year isn't it?  Why?  Because the kids have gone back to school?  Perhaps.... Certainly the house is a whole lot quieter and I'm not asking 3 kids to stop fighting - but I digress.......  No, it's a fantastic time of the year because it's sale-a-bration time again.  What does this mean?  FREE STAMP SETS.  Simply spend $100 on Stampin'Up! products between now and 31 March and you get to choose from a selection of free stamp sets from the sale-a-bration catalogue.

Click on the image of the catalogue below to view the choice of stamp sets available for you to choose from.


Don't forget that my classes start again this Tuesday evening.  Click on the Class Calandar tab at the top of this page for details.  Looking forward to seeing my regular ladies again, and perhaps meeting some new ones this year.

Thursday, January 13, 2011

Happy New Year and a New Promotion

I'd like to wish you all a very happy new year.


I hope you had a very merry Christmas and are surviving the rain that we are experiencing in many parts of Australia.  Much of Queensland is suffering from floods and my prayers are for everyone who has been affected by the flooding.  


I've been absent from blogging recently due to the many Christmas card orders I had prior to Christmas but, with that behind me, and the lovely holiday I've had with my family, I hope to return to more frequent blogging.  Thanks for sticking with me!!


I've returned from my holiday just in time to catch the great promotion Stampin' Up! are offering for Valentines' Day.  Receive a free pack of Heart Treat cups when you purchase the Sweetheart Stamp Set or Full Heart Punch:


Item
Page
Description
Price
121576
38
Sweetheart Wood-Mount Stamp Set
$38.95
120780
38
Sweetheart Clear-Mount Stamp Set
$29.95
119883
147
Full Heart Punch
$33.95

Get a free package of Heart Treat Cups:
Item
Page
Description
Retail Value
120435
122
Heart Treat Cups
$6.50


This promotion is only available until the 24th of January, so please contact me if you'd like to take advantage of it.

Here's a photo of one of my bigger orders that I had before Christmas (just to prove that I have been busy and not avoiding you all....)


It feels good to be back on board.  Chat to you soon.

Tuesday, November 16, 2010

Melbourne Regionals

I'm back.  I know.... two days in a row - don't faint!!

As promised, today I have some photos of a few of the swaps I received from some of the very talented Stampin' Up! Demonstrators who were at Melbourne Regionals on Saturday.

As you can see, I received quite a few swaps.

This is the card I made to swap.  It's intended to be a male Valentine's Day card, but could also be used for his birthday, anniversary etc.

Of all the swaps I received, this was my fave.  It was made by Leanne Spalliera.

And here are some others which are just gorgeous:


Unfortunately this swap didn't have a name with it, but isn't it gorgeous.

Donna Holmes

Rachel Woolard

These next two cards were made by my two gorgeous downlines:

Heather Tiley


And there were even swaps which weren't cards.

This little milk carton has some choccies in it (can you believe it - they are still in there after 3 days??)  Glyn Savage

Sherbet in this one....thanks Amanda Baker

Kaylene Schultz (guest) and Kimmy Meiklejohn

I have many other beautiful swaps, just too many to photograph.  It was a great day at Regionals which I thoroughly enjoyed.

Monday, November 15, 2010

Christmas Wreaths

Sorry I haven't posted for a little while.  Busy with Chrissy "stuff", Regional swaps and work.

I have a couple of Christmas wreath cards to show you today.  Now..... I can't take full credit for these cards as I've seen variations of them on other blogs.  I love surfing the web and looking at what other talented Stampin' Up! Demonstrators create.

This first card uses an old fave stamp set of mine - Pocket Silhouettes.  I've used Old Olive and Pear Pizzazz ink and created the berries with red Fine Galaxy glitter.

This next card took a littler longer to create - okay, a whole lot longer to create.  To save a bit of time I'm quite sure I could have punched out less leaves and it would look just as good.  The leaves are punched from the two-step bird punch and the berries were punched from the two-step owl punch.

They're cute aren't they?

I attended Melbourne Regionals on Saturday (a seminar for Stampin' Up! Demonstrators) and can't wait to show you some of the fantastic swaps I received.  I'll be back shortly with some photos for you to drool over.........

Thursday, October 21, 2010

Dress Up Christmas

Stampin' Up! have come to the party again and have got something special for all of us to enjoy.

During the special promotion period - 16 October-30 November 2010 - you can earn exclusive Stampin' Up! ribbon spools in two different ways:

1.  Purchase a gift-giving bundle and receive one FREE spool of ribbon
2.  Host a $550 workshop and receive a FREE spool of ribbon.

Bundles are as follows:

Gifted Bundle:
Gifted set and Jolly Holiday DSP
Item No: 124041 $66.90 - wood mount
Item No: 124042 $56.90 - clear mount

Welcome Christmas Bundle:
Welcome Christmas set and Christmas Coca specialty DSP
Item No: 124045 $69.90 - wood mount
Item No: 124046 $59.90 - clear mount

Season of Joy Bundle:
Season of Joy set and So Swirly Stampin' Around wheel
Item No: 124043 $67.90 - wood mount

Delightful Decorations Bundle:
Delightful Decorations set and Ornament punch
Item No: 124044 $72.90 - wood mount

Simple email or phone me to place your order of one of the above mentioned bundles and you can choose from a selection of four FREE ribbon spools.


There are no limits to the number of bundles you can purchase.  For every bundle you purchase, another spool of ribbon you may choose.

Please remember that bundles and free exclusive ribbon are only available while supplies last.

Imagine how gorgeous your gifts will look under the Christmas tree this year - wrapped and tied with gorgeous Stampin' Up! accessories.


Monday, October 18, 2010

Owls In Love

I just love the two step owl punch.  He is such a versatile little bird and can be used for both male and female cards.  Here I've used it as a "love" card - valentines day, wedding, anniversary or even a birthday card for your other half.  

In hindsight I shouldn't have used Early Espresso card stock as the background colour behind the owls because they were punched from Early Espresso too - but I'd stuck them down before I realised that the birds were lost a bit in the background - hohum - next time I'll do it different.  Besides that, I really love this card.  Soooooo cute.

If you want the instructions for making this card, please drop me an email.

Saturday, October 16, 2010

Man Overboard

One of my very good friend's son recently celebrated a birthday.  William loves the beach and so I wanted his card to have a fun beachy feel.  This is what I came up with.......

I've used the Bigshot and Timeless Type Junior Alphabet dies to create William's name.  After each letter was glued into place I marked the them with my white gel pen.  The clouds were sponged with white craft ink, as were the tips of each of the waves.  The gel pen was also used to create a few water ripples.  I'm not overly happy with the sun, but that was sponged too and then I used a marker to create the rays (hmmmmm - there has to be a better way to create a sun (lol)).  

Apparently it's William's favorite card and he's (very generously) displayed this card at the front of the all of his other cards (yes, I'm honored!!)

Happy 6th birthday William!

Scraps of DSP

Use up your scrap pieces of designer series paper!

This is a fantastic way to use up those long strips of designer series paper you have lying around your desk.  The original idea for the design of this card was taken from one of the gorgeous cards on the front of the 2010-2011 Idea Book and Catalogue.

I've punched strips of dsp with the Eyelet Border punch and glued the un-punched edge (does that make sense?) of the dsp strips to a piece of scrap card stock.  Once the card stock was fully covered with the strips  I ran it through the Bigshot with the Top Note die.  I then ran my hand backwards over the scalloped edges of the dsp to lift the scallops off the page.

I'm really happy with how this card turned out - it's very "pretty".

Don't forget to use your Stampin' Up! catalogue for creative ideas - hopefully you'll find some fantastic inspiration just as I have.

Wednesday, October 13, 2010

Christmas Stamp-A-Stack


Last night I held my Christmas Stamp-A-Stack class - we made four cards and four Christmas tags.

This first card was made using the Delightful Decorations and Lovely as a Tree (one of my favs) stamp sets.  We punched out the Christmas ornaments with the Ornament extra large punch and tied a piece of linen thread around the top of each one and added a dimensional to the back of them to give lift them off the tree.  The Cherry Cobbler ornament has a rhinestone added to the centre of it to add a bit of bling - you know I love bling!!

This next card is a favorite from last year.  The original card idea came from a swap I received from one of the very talented girls in a Stampin' Up! group that I belong to (I have misplaced the original swap, so if you were the talented girl, please let me know and I'll add your name here).  Anywho.... this card was popular last year, so we made it again this year.  The stamp set is (again) Lovely as a Tree and there is glitter glued to the "window frames" to look like banked snow.  The sentiment is from Many Merry Messages - this stamp set covers all your sentiment needs for Christmas - love it!!

We then made four Chrismas tags using the Punch Pals stamp set.  All the images were stamped with StazOn black ink and we then coloured the images with markers.  How gorgeous will these look on gifts under the tree??

 If you are interested in attending my classes, please give me a call or drop me an email.


Sunday, September 26, 2010

Christmas Stamp-A-Stack


I hate to scare you all to death......... BUT CHRISTMAS IS JUST AROUND THE CORNER!!  

Now is the time to think about how many cards you need to make and to start ordering your supplies, and then..... start making them.  At my Stamp-A-Stack class this month we are going to start our Christmas cards.  Please give me call to book your spot if you'd like to attend this class.  Click on the tab at the top of this page to view class dates and times.

Cards in the Spotlight

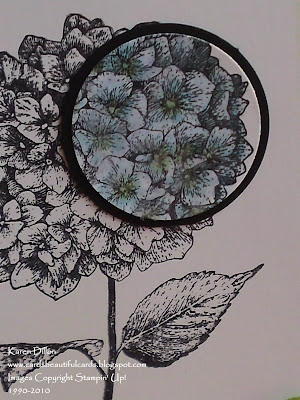
At this month's Technique Tutorial we made cards using the spotlight technique.  This technique is supposed to look like you are shining a light on to part of a stamped image to "light it up" - like it's in the spotlight.

Do you think we achieved this?

This first card uses the gorgeous hydrangea stamp from the the level 1 hostess stamp set Because I Care.

Here's a close up of the spotlight technique:  This image was coloured with blender pens and ink from the fantastic selection of Stampin' Up!'s stamp pads.

For the second card we used another gorgeous stamp set, Elements of Style.  I think I'll be using this stamp set for several more techniques so I hope you like it as much as me....

And here's another close up of the technique:  This image was coloured with markers.

At October's Technique Tutorial we'll be learning colouring with watercolour crayons.  Click on the classes tab at the top of this page for class dates and times.

I (FINALLY) used my brand new owl punch today, so stay tuned for some cute owl cards in the near future.

Friday, September 24, 2010

5 Petals

Have you noticed a bit of a theme with my cards lately?  I'm loving flowers with leaves!

I whipped up these cards on Monday - okay, I wish I had just whipped them up - it took me all day to come up with these designs (my mojo is returning - but slowly (lol)).

I wanted to create four cards using a similar style.  What do you think?

The flowers have been made using the 5-petal flower punch.  I punched 4 flowers for each card and rubbed the top of each flower roughly with my stylus.  

Each of the cards have been made on very vanilla and riding hood red card stock.  For this first card I ran the  top note shaped card stock through the polka dot embossing folder.   


I used the top note die and the manhattan flower embossing folder on very vanilla card stock for this card.
 

The next two cards use the scallop circle die with the same embossing folders.

I cut the base of this card down a little to make it more square.

I've also used the colour spritzer tool and spritzed black ink onto some of the flowers.  What do you think of the striped grosgrain ribbon?  I really like it - it's old olive, so of course I like it (lol).  I also like the large 3.2cm width - it adds a great dimension to the cards.

If you have any questions about how these cards were assembled, please don't hesitate to email me with your questions.