Thursday, April 22, 2010

Embossing Folders

Have I mentioned that I'm thoroughly enjoying my new Big Shot?  Yeah, I know.... only a hundred times!!  

These are a couple of cards that I made a little while ago.  I've used the Stampin' Up! Textured Impressions Embossing Folders which create a deep embossed image.  

I'm thinking I might add a "Happy Mother's Day" message to this Manhattan Flower card and send it to Mum.  

I've already given this Perfect Polka Dots card away to one of my regular customers (hi Rachel), so had better make another.

Friday, April 16, 2010

Faux Stitching and Faux Tiling Technique Classes

Unfortunately I had to cancel the faux stitching technique class last month (sorry to my regular ladies).  Therefore, the scheduled faux tiling class this month will also incorporate faux stitching.

Date:  Wednesday, 28th April
Time:  7:30pm
Venue:  My home
Cost:  $15.00 (4 cards and envelopes - 2 cards of each technique.  All materials supplied)  
RSVP:  27th April

Please  telephone me (0419 945 031) if you'd like to come along.

Mother's Day Gift Offer

I'm offering you a gift for Mother's Day!!


Order the Big Shot Die-Cutting Machine ($179.95) before Mother's Day and I will GIVE you the Buttons #5 Sizzlits Die (valued at $9.95 - page 10 of the Autumn-Winter Mini Catalogue).

I can't tell you how much I'm enjoying using the Big Shot, and it has added a whole new dimension to my cards.  If you'd like to demonstrate the Big Shot, please give me a call on 0419 945 031 to arrange a suitable time.

So talk to your kids and let them know what you'd like for Mother's Day this year.


(Please note, this offer is not a Stampin' Up! offer and is only available from me - thanks)


Baby Cards


Now for a couple of cute baby cards.  I don't have the need to make many of these anymore, so it's always fun when I do.  I have to confess that I've cased the baby boy card from a magazine, and then I created the baby girl card along the same lines.  Both cards are made on a Kraft card base which has been embossed half way with the SU Perfect Polka Dots embossing folder and I've used the Nursery Necessities stamp set.


Maureen's Thank You Cards

Hi there, sorry it's been a few weeks since my last post.  What with Easter, the whole family having gastro, school going back and an intense swimming programme for the kids, I haven't really had  much time to update my blog.  Okay, apologies over, I'll show you what  I have found time to do.

Do you remember the card and gift voucher holder that I made for a friend's 60th birthday? (click here if you don't).  Well, Maureen liked the card so much that she asked me to make her thank you cards in the same colours and layout.  This is what I came up with...

I've embossed Whisper White card stock with the  SU Perfect Polka Dots textured impressions embossing folder and adhered it to a piece of Rich Razzleberry card stock.

The flower is cut from the new Vintage Vogue stamp set using the Rich Razzleberry and Orchid Opulence stamp pads.  I've adhered the flower with a brass brad to Orchid Opulence and Rich Razzleberry card stock and a piece of the new Rich Razzleberry polka dot grosgrain ribbon.  The gorgeous leaf has been cut from the SU Little Leaves sizzlits die and glued behind the flower.  I stamped the thank you message from the new Teeny Tiny Sentiments stamp set and punched it out with the window punch.  Maureen was very happy with the end result.

Ohh - did I mention that she needed 45 of them!!


Thursday, April 1, 2010

ESAD Autumn-Winter Mini Catalogue Blog Hop

Yay!  It's the 1st of April which means the new Autumn-Winter Mini Catalogue has been launched today.  If you'd like a copy of the new catalogue mailed to you, please email me and I'll pop one in the mail to you.  Otherwise, take a look at it on-line by clicking on the image of the catalogue on the right.  Enjoy!!!

 If you are taking part in the ESAD Autumn-Winter Mini Catalogue Blog Hop - WELCOME. You will have just "hopped" over here from Julliette Chapman's blog.

I'm delighted to be taking part in another blog-hop with the wonderfully, talented group at ESAD.

What is ESAD?  Well, it stands for Extra Special Australian (and New Zealand) Demonstrators and it's an online group just for Australian and New Zealand Stampin' Up! Demonstrators.  We all love to craft and share our creations, not only with our customers, friends and blog visitors, but with each other as Demonstrators.  We run swaps, challenges, tutorials, product know how and cyberstamps, and we are always there to help and support each other when it's needed.

So, if you're a Stampin' Up! Demonstrator located in Australia or New Zealand, then please feel free to click here to join our wonderful group.  If you're interested in becoming a Demonstrator so that you too can be a  part of this talented group, please contact me.

For this blog hop I've made several things to share with you.  A pillow-box, a scrapbook page and a card.

Elegant Pillow-Box

This cute little box was created with my brand new Big Shot die-cutting machine (yes, I'm a little excited about having it).  Using Elegant Eggplant card stock, I cut out the image with the pillow-box die and then randomly stamped the large flower from Vintage Vogue onto it with Elegant Eggplant ink.  I decided to purchase this stamp set in the new clear mount rubber stamps and I think I've been converted!!

To embellish the box I used the Stampin' Up! Little Leaves Sizzlits Die to cut the leaf  from Certainly Celery card stock and tied Certainly Celery ribbon around the centre of the box.  I then used the Buttons # 5 Sizzlits Die to cut out the button and gave it a gloss with Crystal Effects.

This box is a perfect size for popping in a small piece of jewellery as a gift.  It would also be a great way to present a small gift for hostesses (would you like one?)


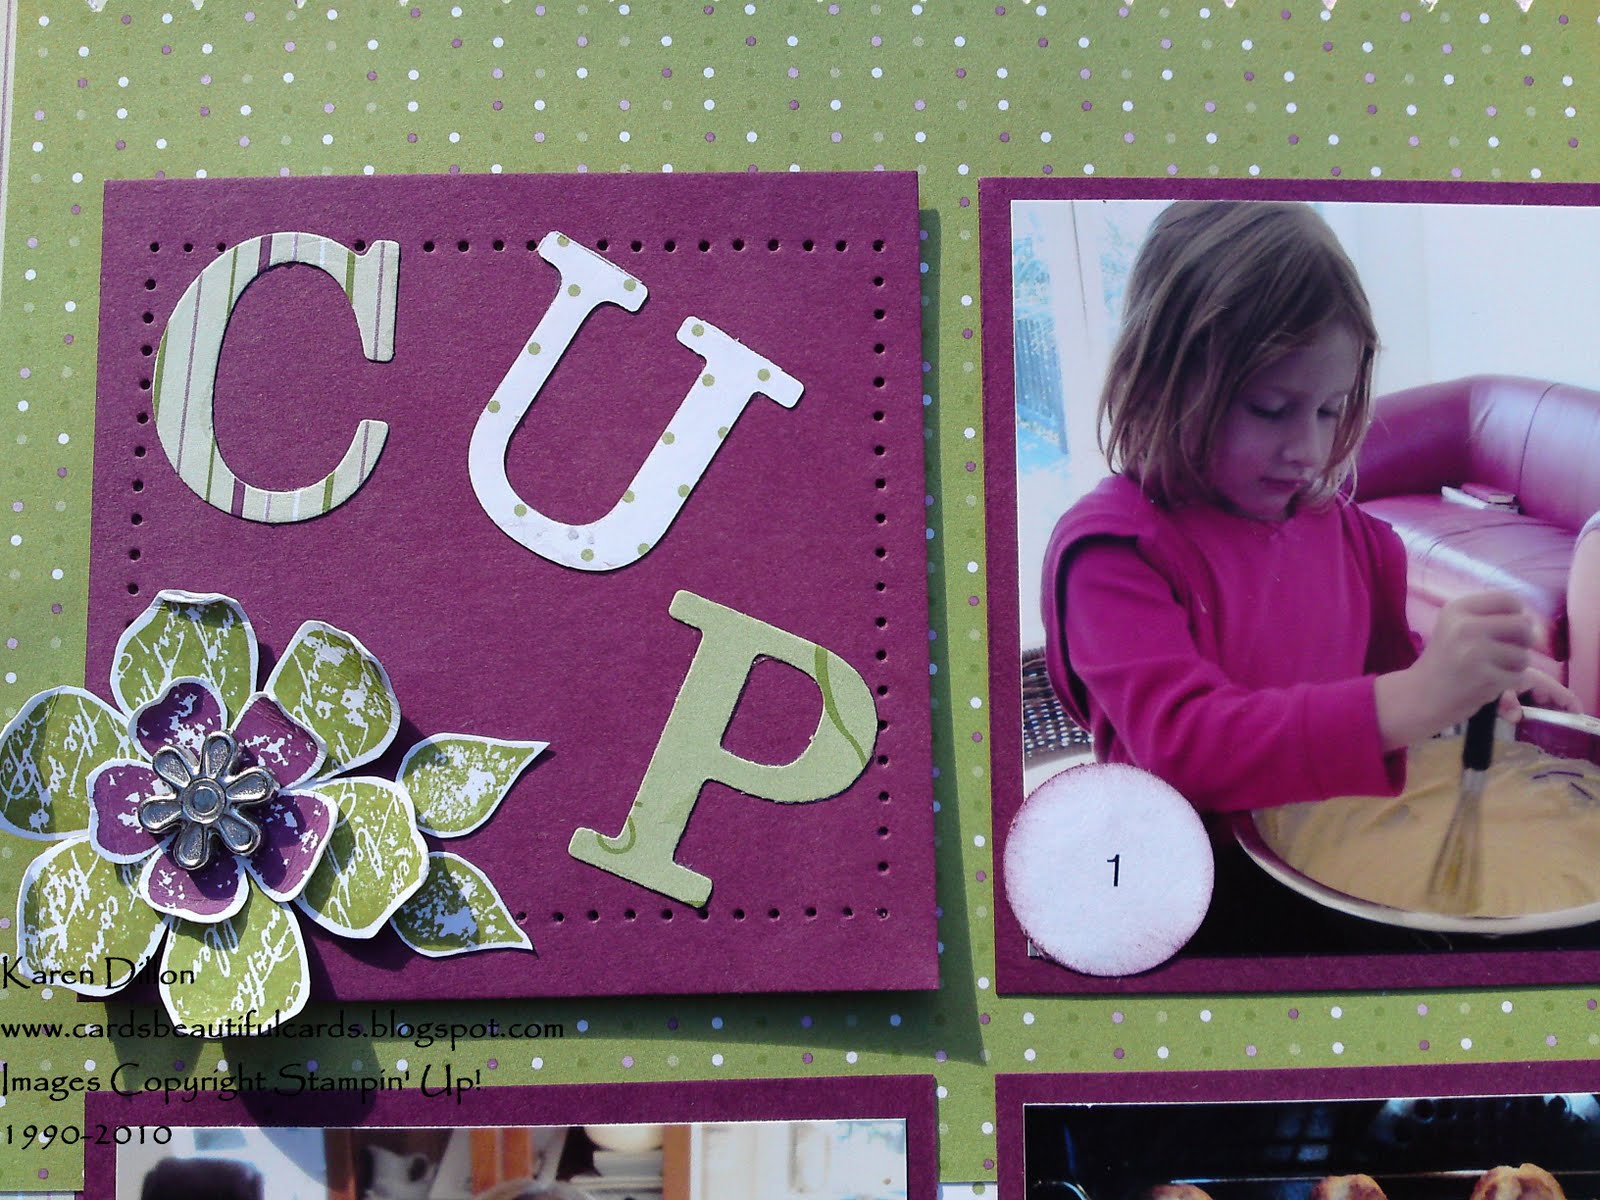
Cup Cake Scrapbook Page

I haven't been scrapping for long, but I must confess that when I do make a page, I thoroughly enjoy it.  This page was created of Holly, my youngest (of 3) children.   Bailey joined his big sister, Caitlin, at school this year which means that Holly and I have lots of quality time together.  On this particular day we decided to make cup cakes.  They were delicious...


One of the biggest reasons (but who really needs a reason- right?) why I LOVE the Big Shot is because of the alphabet dies.  These are great!!  Even if you don't scrapbook, but you  like to add names to cards - these are a must.

For this page I've used several sheets of the Cottage Wall designer series paper as the background and for  the lettering.  The squares are cut from Rich Razzleberry (one of the new colours) and I've stamped the flowers from the Vintage Vogue stamp set (this is my new fav).


A few brads, ribbon and the scallop edge punch have been used to embellish.  Overall, I'm really happy with the final page.


Lots of Bots Robot Card

For this card I've used the Lots of Bots stamp set.  This is a great set and I'm sure it will get a lot of use this year (due to having a 6 year old son).

I've used Pacific Point card stock for the  background and I crimped a piece of silver card stock to add some texture.  I would have liked to have used silver eyelets but I didn't have any so had to make do with the black ones.  I coloured the image in with ink and blender pens.

Bailey thinks it's a "cool" card, so I guess that's good.

As part of this blog hop we are again offering Blog Candy (not lollies, but gifts from the Demonstrators).  What you need to do is complete the blog hop until you get back to me (or who ever you started with).  Once you've visited and commented on every blog, then you'll need to email Sharlene at stampwithsharlene@hotmail.com who will then put your name into the draw for the blog candy.  There will be one winner from New Zealand and one from Australia.

Your next blog to hop on over to is the talented Karen Rogers.  Thanks for visiting and please don't forget to leave a comment.  Happy Hopping!!

Sunday, March 28, 2010

Showing Off A New Colour

Yippee!!!  I've received my box of goodies and let me just say "I'm in heaven!!".  You are going to lurve the new mini catalogue.

Of course, I've put my some of my new "stuff" to good use already.  A very good friend of our family (Maureen) will turn 60 this week and I've made a gorgeous card for her (even if I do say so myself).  What do you think of the new colour?  This is just one of three of the new colours in the new mini catalogue (but I'll be able to discuss this in more detail with you on the 1st).

I'm addicted to flowers at the moment, so this is another card with a big puffy flower - but check out the textured background (told you.... you're going to lurve it). And the numbers - way too easy!


As a gift, we purchased for Maureen two Gold Class tickets to the movies, so I also made a holder for the tickets to sit in to match the card.


So, what do you think?  Leave me a comment as I'd love to hear your thouhts.

Hope you have a great rest of the weekend.  You've probably guessed what I'll be doing.......

Thursday, March 18, 2010

Autumn-Winter Mini Catalogue

I'm soooooooooo excited!  Why, I hear you ask.  I've just placed my order from the new Autumn-Winter Mini Catalogue - due to be released on the 1st of April to you.  Let me just tell you that there are HEAPS of awesome things in this catalogue - new stamps, stamp designs, new punches (including a two step punch - yes two step!!), new in-colours, designer series paper, ribbons and embellishments - but best of all (drum roll) A BIG SHOT DIE-CUTTING MACHINE AND DIES.  I've been hanging out for these to become available through Stampin' Up!, so yes, I am a little excited.

As I mentioned, the catalogue is available to you on the 1st of April.  If you'd like to have your very own copy of the catalogue, please contact me and I'll forward a copy to you, alternatively, I'll have a link here on my blog for you to view the awesomeness (yes, I'm sure that's a word) on-line on the 1st.

In the meantime, don't forget that Sale-A-Bration is still running until the end of this month.  Contact me with your order of $100 worth of Stampin' Up! products, and choose one of the four fantastic free sets.

Here are a couple of cards I've made using the Happy Moments stamp set.  Both images have been coloured using markers.  I've hung the bird cage from the tree branch of the Cheep Talk stamp set using linen thread and added a dimensional behind the cage.  I recently made this card as part of a workshop and everyone was surprised how quick and easy it was to make.


See, the thread makes the cage look like it's swinging from the tree


Don't miss out on your free stamp sets........ and start saving for the new Mini Catalogue goodies.

Wednesday, March 17, 2010

Cute Little Card Storage Tote

I recently came across a gorgeous card storage tote, designed by Lynda Moss, a very talented Stampin' Up! Demonstrator.  I just loved it and had to have a go at making one for myself.  I'm delighted with the outcome.

These will make fantastic gifts for kinder and school teachers this Christmas!! (Phew, that's several gifts sorted).

Front View - A little pocket on the front to hold stamps and a ribbon loop to hold your pen

See how the bag closes together nicely and you can open it out to easily insert and select your cards.  You'll never forget anyone's birthday again because you'll write their name on the monthly insert and have their card  (hand made of course) ready to send to them.


What do you think?  If you're interested in purchasing the instructions for this tote, please visit Lynda's Blog and purchase the instructions, or if  you'd like to have a group get-together with me, please contact me to set a date.

Thursday, March 11, 2010

Mojo Monday 129

I decided to enter a sketch challenge to get my creative juices flowing.  You know how sometimes you just can't seem to create anything that looks good - well that happened to me when I sat down to make my Mother-in-law's birthday card (and that's a card you want to look good (lol)).  So I took a peek at the Mojo Monday blog site and decided to make a card using their sketch for this week.

Here is this week's sketch:


And here is my take on it:
My regular customers will tell you that I'm an "Earth Elements" girl from way back when, so I must confess that most of my cards incorporate these gorgeous colours. 

For this particular card I've used Chocolate Chip, Riding Hood Red, Pink Pirouette and Whisper White card stock.  The designer series paper is from the Sweet Nothings Simply Scrappin' kit (love it!!).  I've used the Cheep Talk stamp set and coloured the image using the Ruby Red, Old Olive and Choc Chip markers.  I've also used a small piece of Riding Hood Red taffeta ribbon and "scrunched" a small flower together using the 3/4" circle punch (as per my instruction on my previous entry).

So, if you feel you've lost your "mojo", why don't you visit the Mojo Monday blog for some inspiration too.

Happy Birthday Lois!  I hope you like your card.


Monday, March 8, 2010

40th Wedding Anniversary

Mum and Dad celebrated their 40th Wedding Anniversary yesterday and I'm really happy with the card that I made for this special occasion.

As you know, the 40th Wedding Anniversary is a Ruby Anniversary so I used Riding Hood Red card stock on Whisper White card stock and made these gorgeous flowers with Bella Rose designer series paper.

I placed a red button (from  the Button Bouquet set) on top of a piece of Riding Hood Red taffeta ribbon.  The sentiment is stamped from the Fun and Fast Notes stamp set.

Finally, I distressed all edges of the card stock and paper pierced the edges of the white card stock.

To make the flowers you will need to punch 6 - 8 scallop circles from designer series paper and place a brad in the centre of each stack.  You will then scrunch the paper up around the brad to create the flower.  Cut a leaf shape out and glue under the flowers (I scrunched the leaf too).

I made a little box to place the card in - the card didn't fit into an envelope because the flowers sit up quite high (doh!!).

The parcel arrived in Perth safe and sound and Mum and Dad both loved their cards and gifts.

Happy 40th Anniversary to them both!!

Sunday, February 28, 2010

A Few More Boy's Cards

It's always difficult to come up with a boy's cards.  Personally, I like making pretty cards with butterflies and flowers (you know, all things girly), so when I've got to design a card for boys I stumble a little.  Anyway I came up with these which I'm quite pleased with.  Thank goodness for my star punches and the Sweet Treat Cups.

These two cards use the large star punch.  Select your coloured card stock and punch out your star.  Add a piece of designer series paper behind the punched out star and adhere to more card stock.  Stamp your birthday message.  Pretty simple.
   

A friend asked me to make a card for a 10 year old boy, so for this card I've used a Sweet Treat Cup (again) and used it to make up the number 10.  I placed two sour bombs inside the cup (which should please a 10 year old).  I also wrapped some twine across the card to make it look a little bit more grown up.  I was quite pleased with the final card.

Hope you're having a nice weekend.  I've made my parent's 40th Wedding Anniversary card today but won't post it here until the day of their anniversary (just in case they peek).  I can't wait to show you - I'm really happy with it (a bit different to my usual cards).

Thursday, February 25, 2010

Chalkboard Technique Class

I held a chalkboard technique class last night and these are the cards the group made.


I've run out of time to write down all the stamps sets and card stock that was used (have to collect the kids from school and kinder), but if you'd like to know please email me.

Wednesday, February 24, 2010

More Sweet Treat Cups


One of Bailey's little friends in Prep had a birthday today and this is the card we made for him (Bailey helped by punching out the stars).

We filled the Sweet Treat Cup with orange flavoured M&Ms.

Cute hey.

Monday, February 15, 2010

Happy Birthday Josh

My nephew celebrated his 6th birthday on Sunday so I pulled out the sweet treat cups and used them for the first time.  The slip of red card on the left hand side pulls out to reveal the M&Ms inside the cup - no need to tear the card apart to get to them.  I'm happy to report that the card was a great success.

Sunday, February 14, 2010

Happy Birthday Dad!!

My Dad is having a BIG birthday tomorrow.  He'll be 60!  As I've mentioned before Mum and Dad live in Perth at the moment so I decided to make him a card with a photo of all of us on it (no stamping!!).  Like Paul's Valentines Day card (which he liked by the way), I've used Baja Breeze textured card stock, Chocolate Chip and Kiwi Kiss card stock, Chocolate Chip ribbon and brass brads.  I punched out some photo corners and added them to the corners of the photo too.  I also shaded the edges of the Baja Breeze and Kiwi Kiss with Chocolate Chip ink.  I hope he likes it when he receives it in the morning.  HAPPY BIRTHDAY DAD!!

PS - I received a Pandora charm for Valentine's Day.  How gorgeous is my husband??

Friday, February 12, 2010

Valentine's Day

I made this card for my husband for Valentine's Day.  I made several cards for Valentine's Day and then realized that they were all pink and feminine - not for my husband at all.  This card is quite plain but gets the message across don't you think.

I've used Baja Breeze textured card stock with Chocolate Chip card stock, chocolate chip satin ribbon, the heart punch and I {Heart} Hearts stamp set.  The sentiment is one of the rubons from the Summer Mini Catalogue.  I've stamped the love heart twice, cut them out and glued both hearts (back to back) to a piece of twine which I've glued to the centre of the punched out heart.

Happy Valentine's Day for Sunday!!

Monday, February 8, 2010

February's Technique Class

This month's technique class is the chalkboard technique.  This is such a great way to create colourful cards and scrap pages.  Classes start at 7:30pm (my home) and cost $15.00.  You'll learn the technique and create 3 cards using the new technique.  Please email or call me if you would like to attend.  If you are unable to attend but would like to still learn this technique, please give me a call and we'll arrange a date and time suitable for you to come to me, or I'm more than happy to travel to you.


I've created this card using the chalkboard technique and the Rustic Rooster Hostess Level 2 stamp set.  What do you think?


Saturday, February 6, 2010

School's Back

The first week of school for 2010 is over.  Caitie has settled into Grade 2 very nicely and Bailey, who started Prep, seems to be enjoying school, although he wants to know (already) when school holidays start - lol.  Holly has started "big kinder" but with that whole transitional thing happening - you know, an hour this week, an hour and a half next week......  So - with the kids at school I'm really hoping that I'll get a few more hours for stamping (fingers crossed).  


This week I had an order of 30 cards to make for a Real Estate Agent.  So, between school, kinder and catching up with the other mums for coffee (lol) I made the cards and forgot to take photos of them (doh!!).  I've attached a couple of photos of a few that I'd made from a previous order.  I've used the Neighborhood jumbo wheel with various different designer series papers and card stock.  


I have a few cards to make this month - Dad's 60th, hubby's 40th, a nephew's birthday and of course Valentine's Day.  I'm also planning this month's technique class - Chalking Technique. With a bit of luck I'll get a couple of hours today to get started - we'll see.....

Monday, January 25, 2010

Sale-a-Bration Blog Hop


Welcome to all blog hoppers!!

I'm very excited about the blog hop that the ESAD group have put together. For those of you not familiar with who the ESAD group are, please let me explain. ESAD stands for Extra Special Australian (and New Zealand) Demonstrators and it's an online group of Stampin' Up! Demonstrators who speak regularly via emails and on-line forums. We love what we do and we love to share it with our customers, friends and (of course) our blog visitors.


If you are an Australian or New Zealand Stampin' Up! Demonstrator and would like to join this fantastic group please click here. If you are not currently a Demonstrator, but have been thinking about starting your own business, or simply just want to purchase the starter kit, please email me at the address on the right of this screen.


Now, down to what I have created for you..... This blog hop is all about promoting the Sale-a-Bration stamp sets (see blow posts to see how you can get your free stamp sets). I have used the Whimsical Words set for both my projects.


Project 1 - A Scrapbook Page
I've scrapped a page of my immediate family.  Caitlin (7yo daughter) took this photo at Christmas with her new camera (another scrapbooker in the making (lol)).  We don't very often get the opportunity to all be together (Mum and Dad are currently living in Perth), so I am delighted with this page.


I just love how bright and colourful this page is.  I've used quite a few products from the Summer Mini Catalogue to create this page.


Ingredients:
Stamp Set:  Whimsical Words
Card Stock:  Tangerine Tango 12x12 card stock, Kaleidascope Designer Series Paper, (scrap/offcuts of designer series paper to cover chipboard letters), Pacific Point, Certainly Celery
Ink:  Pacific Point
Accessories:  On Board Loads of Letters and Batch of Blooms, Brads, large circle Metal Edge Tag, Flower Fusion felt flowers, 4.4cm Circle Punch, Circle Scissor, Basic Jumbo Grommets, Tempting Turquoise 1/4" ribbon, Certainly Celery 5/8" grosgrain ribbon, Pretty in Pink taffeta ribbon, So Saffron ribbon (from previous promotion), dimensionals, snail, double sided tape.


Project 2 - A New Baby Boy
I haven't had the need to make many baby cards lately, so I enjoyed making this card for a change from the usual birthday cards.

I think the glitter around the edges of the images looks lovely, unfortunately the photo doesn't quite show it off.


Ingredients:
Stamp Sets:  Whimsical Words, Nursery Necessities
Card Stock:  Bashful Blue textured card stock, Whisper White card stock
Ink:  Bashful Blue, Barely Banana
Accessories:  Oval Scallop Punch, 1/2" Circle Punch, Bashful Blue striped grosgrain ribbon, Dazzling Daimonds, dauber, dimensionals, two way glue, double sided tape


Please leave a comment to let me know what you think of my creations.


How do I leave a comment?
  • Click on Comments (below).
  • Click in the Comments box and t6ype your message - please remember to leave your name at the end of your message
  • Click on anonymous (if you don't know your URL address etc)
  • Click on Publish Your Comment
If you are taking part in the blog hop please visit all the blog hop blogs, leave a comment on each site and you will be eligible to enter a blog candy draw - remember, you must leave a comment at each blog involved in the blog hop.


Continue your blog hop now to Kerri Hunter's gorgeous website and thank you VERY MUCH for taking the time to visit my blog. I hope you'll come back soon.

Friday, January 22, 2010

Haitian Disaster Relief

Stampin' Up! really is a fantastic company to work for - here's why.


From now until 28 February 2010, $2 from every I {Heart} Hearts stamp set (in the Summer Mini Catalogue) that is sold will be donated to the  Red Cross Haiti Relief and Development Fund.  The Red Cross is already well established in Haiti, and this money will be used to provide immediate relief and long-term support through supplies, technical assistance and other support to help those in need.  Click here for further details and to view the I {Heart} Hearts stamp set.


Please help to make a difference.  Contact me to purchase this stamp set and I will give you one sponge dauber free (you must mention this blog offer for your free dauber).


Thanks.

Bella Rose Birthday Card


Hello again.


Thought I'd pop in and show you a birthday card I created using the Bella Rose Designer Series Paper (I really love this paper).  I've selected Chocolate Chip, Pink Pirouette and Whisper White card stock as my colour bases.  Then, simply hole punch your desired paper, lay them out and da daa.  I've added a couple of Designer Buttons and Chocolate Chip ribbon too to embellish.  The Birthday stamp is from the Upsy Daisy stamp set and I've stamped it using Riding Hood Red ink.


All products are Stampin' Up! unless stated otherwise.