Sunday, February 28, 2010

A Few More Boy's Cards

It's always difficult to come up with a boy's cards.  Personally, I like making pretty cards with butterflies and flowers (you know, all things girly), so when I've got to design a card for boys I stumble a little.  Anyway I came up with these which I'm quite pleased with.  Thank goodness for my star punches and the Sweet Treat Cups.

These two cards use the large star punch.  Select your coloured card stock and punch out your star.  Add a piece of designer series paper behind the punched out star and adhere to more card stock.  Stamp your birthday message.  Pretty simple.
   

A friend asked me to make a card for a 10 year old boy, so for this card I've used a Sweet Treat Cup (again) and used it to make up the number 10.  I placed two sour bombs inside the cup (which should please a 10 year old).  I also wrapped some twine across the card to make it look a little bit more grown up.  I was quite pleased with the final card.

Hope you're having a nice weekend.  I've made my parent's 40th Wedding Anniversary card today but won't post it here until the day of their anniversary (just in case they peek).  I can't wait to show you - I'm really happy with it (a bit different to my usual cards).

Thursday, February 25, 2010

Chalkboard Technique Class

I held a chalkboard technique class last night and these are the cards the group made.


I've run out of time to write down all the stamps sets and card stock that was used (have to collect the kids from school and kinder), but if you'd like to know please email me.

Wednesday, February 24, 2010

More Sweet Treat Cups


One of Bailey's little friends in Prep had a birthday today and this is the card we made for him (Bailey helped by punching out the stars).

We filled the Sweet Treat Cup with orange flavoured M&Ms.

Cute hey.

Monday, February 15, 2010

Happy Birthday Josh

My nephew celebrated his 6th birthday on Sunday so I pulled out the sweet treat cups and used them for the first time.  The slip of red card on the left hand side pulls out to reveal the M&Ms inside the cup - no need to tear the card apart to get to them.  I'm happy to report that the card was a great success.

Sunday, February 14, 2010

Happy Birthday Dad!!

My Dad is having a BIG birthday tomorrow.  He'll be 60!  As I've mentioned before Mum and Dad live in Perth at the moment so I decided to make him a card with a photo of all of us on it (no stamping!!).  Like Paul's Valentines Day card (which he liked by the way), I've used Baja Breeze textured card stock, Chocolate Chip and Kiwi Kiss card stock, Chocolate Chip ribbon and brass brads.  I punched out some photo corners and added them to the corners of the photo too.  I also shaded the edges of the Baja Breeze and Kiwi Kiss with Chocolate Chip ink.  I hope he likes it when he receives it in the morning.  HAPPY BIRTHDAY DAD!!

PS - I received a Pandora charm for Valentine's Day.  How gorgeous is my husband??

Friday, February 12, 2010

Valentine's Day

I made this card for my husband for Valentine's Day.  I made several cards for Valentine's Day and then realized that they were all pink and feminine - not for my husband at all.  This card is quite plain but gets the message across don't you think.

I've used Baja Breeze textured card stock with Chocolate Chip card stock, chocolate chip satin ribbon, the heart punch and I {Heart} Hearts stamp set.  The sentiment is one of the rubons from the Summer Mini Catalogue.  I've stamped the love heart twice, cut them out and glued both hearts (back to back) to a piece of twine which I've glued to the centre of the punched out heart.

Happy Valentine's Day for Sunday!!

Monday, February 8, 2010

February's Technique Class

This month's technique class is the chalkboard technique.  This is such a great way to create colourful cards and scrap pages.  Classes start at 7:30pm (my home) and cost $15.00.  You'll learn the technique and create 3 cards using the new technique.  Please email or call me if you would like to attend.  If you are unable to attend but would like to still learn this technique, please give me a call and we'll arrange a date and time suitable for you to come to me, or I'm more than happy to travel to you.


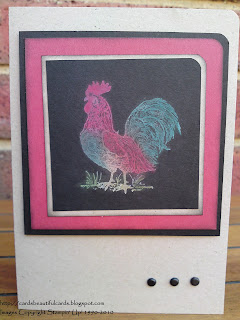
I've created this card using the chalkboard technique and the Rustic Rooster Hostess Level 2 stamp set.  What do you think?


Saturday, February 6, 2010

School's Back

The first week of school for 2010 is over.  Caitie has settled into Grade 2 very nicely and Bailey, who started Prep, seems to be enjoying school, although he wants to know (already) when school holidays start - lol.  Holly has started "big kinder" but with that whole transitional thing happening - you know, an hour this week, an hour and a half next week......  So - with the kids at school I'm really hoping that I'll get a few more hours for stamping (fingers crossed).  


This week I had an order of 30 cards to make for a Real Estate Agent.  So, between school, kinder and catching up with the other mums for coffee (lol) I made the cards and forgot to take photos of them (doh!!).  I've attached a couple of photos of a few that I'd made from a previous order.  I've used the Neighborhood jumbo wheel with various different designer series papers and card stock.  


I have a few cards to make this month - Dad's 60th, hubby's 40th, a nephew's birthday and of course Valentine's Day.  I'm also planning this month's technique class - Chalking Technique. With a bit of luck I'll get a couple of hours today to get started - we'll see.....